ElasticSearch Cluster Migration across Accounts
Scroll DownSnapshots are backups of a cluster's data and state. State includes cluster settings, node information, index settings, and shard allocation. ElasticSearch (aka OpenSearch) snapshots are incremental, meaning that they only store data that has changed since the last successful snapshot. This incremental nature means that the difference in disk usage between frequent and infrequent snapshots is often minimal.
ElasticSearch Service snapshots come in the following forms:
- Automated snapshots are only for cluster recovery. You can use them to restore your domain in the event of red cluster status or data loss. Automated snapshots are read-only from within a given domain. You cannot use automated snapshots to migrate to new domains. ElasticSearch Service stores automated snapshots in a preconfigured Amazon S3 bucket at no additional charge.
- Manual snapshots are for cluster recovery or for moving data from one cluster to another. You have to initiate manual snapshots. These snapshots are stored in your own Amazon S3 bucket and standard S3 charges apply. If you have a snapshot from a self-managed OpenSearch cluster, you can use that snapshot to migrate to an OpenSearch Service domain.
Snapshots provide a convenient way to migrate data across Amazon ElasticSearch Service domains and recover from failure. For migrations, you must use manual snapshots.
The snapshot workflow
ElasticSearch stores snapshots in an off-cluster storage location called a snapshot repository. Before you can take or restore snapshots, you must register a snapshot repository on the cluster. ElasticSearch supports several repository types with cloud storage options, including:
- AWS S3 bucket
- Google Cloud Storage (GCS)
- Microsoft Azure
After you register a snapshot repository, you can then restore a snapshot to recover or transfer its data.
How snapshots work
Snapshots are automatically deduplicated to save storage space and reduce network transfer costs. To back up an index, a snapshot makes a copy of the index’s segments and stores them in the snapshot repository. Since segments are immutable, the snapshot only needs to copy any new segments created since the repository’s last snapshot.
Each snapshot is also logically independent. When you delete a snapshot, ElasticSearch only deletes the segments used exclusively by that snapshot. ElasticSearch doesn’t delete segments used by other snapshots in the repository.
Snapshots and shard allocation
A snapshot copies segments from an index’s primary shards. When you start a snapshot, ElasticSearch immediately starts copying the segments of any available primary shards. If a shard is starting or relocating, ElasticSearch will wait for these processes to complete before copying the shard’s segments. If one or more primary shards aren’t available, the snapshot attempt fails.
Once a snapshot begins copying a shard’s segments, ElasticSearch won’t move the shard to another node, even if rebalancing or shard allocation settings would typically trigger reallocation. ElasticSearch will only move the shard after the snapshot finishes copying the shard’s data.
Prerequisites
- Create a S3 bucket where the ES cluster is present so that we can take the snapshot into the S3 bucket.
- Create IAM role and attach an IAM policy.
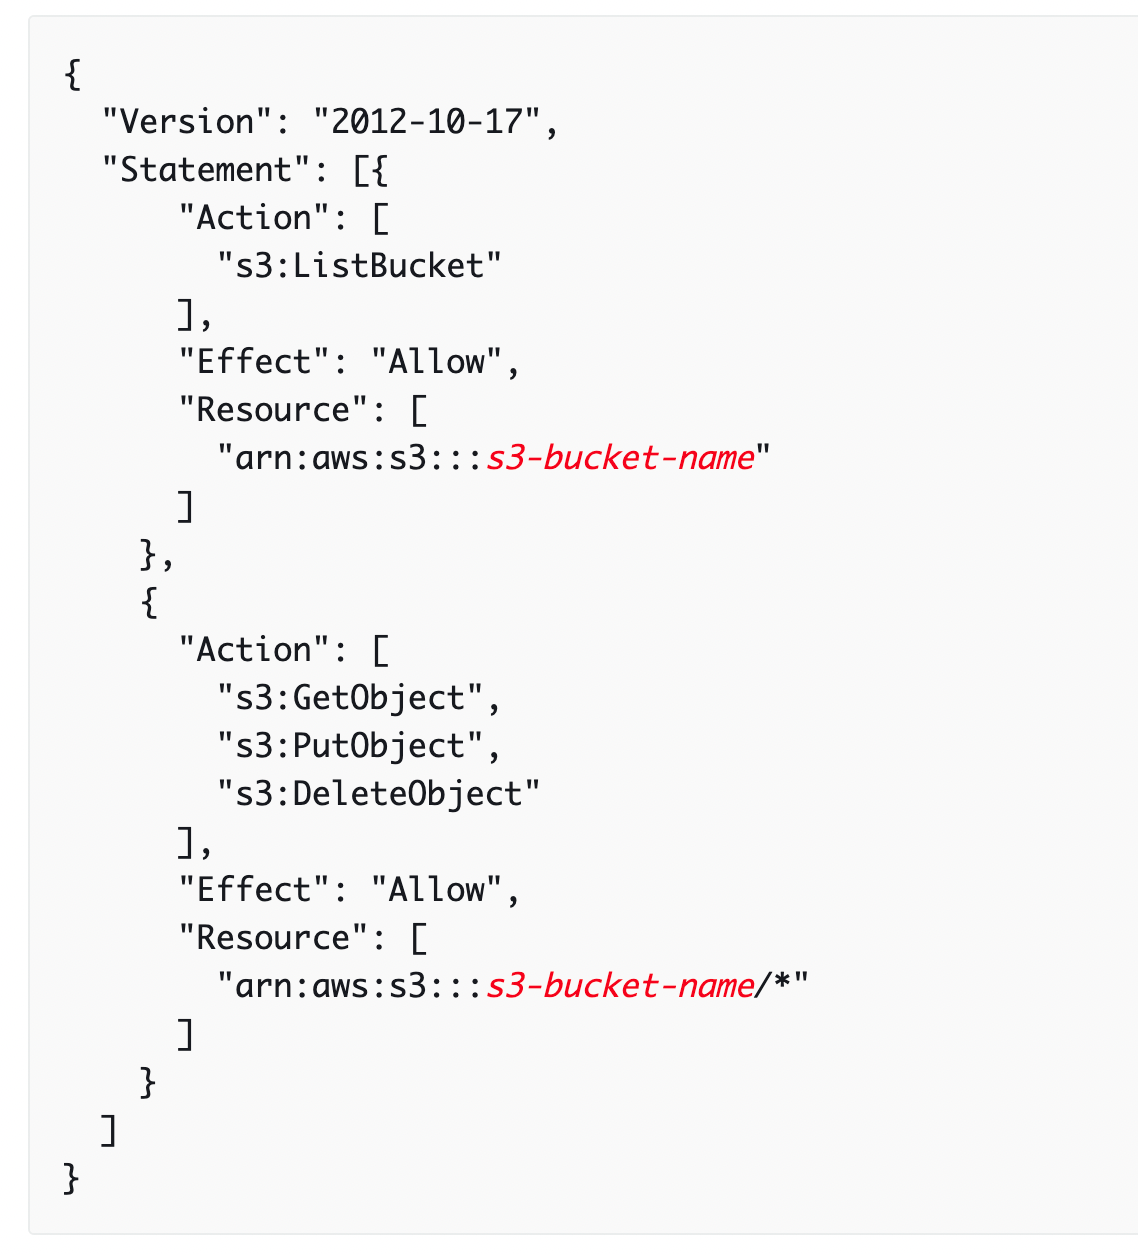
Attach the following policy to TheSnapshotRole role to allow access to the S3 bucket, replace the s3-bucket-name with the S3 bucket ARN.
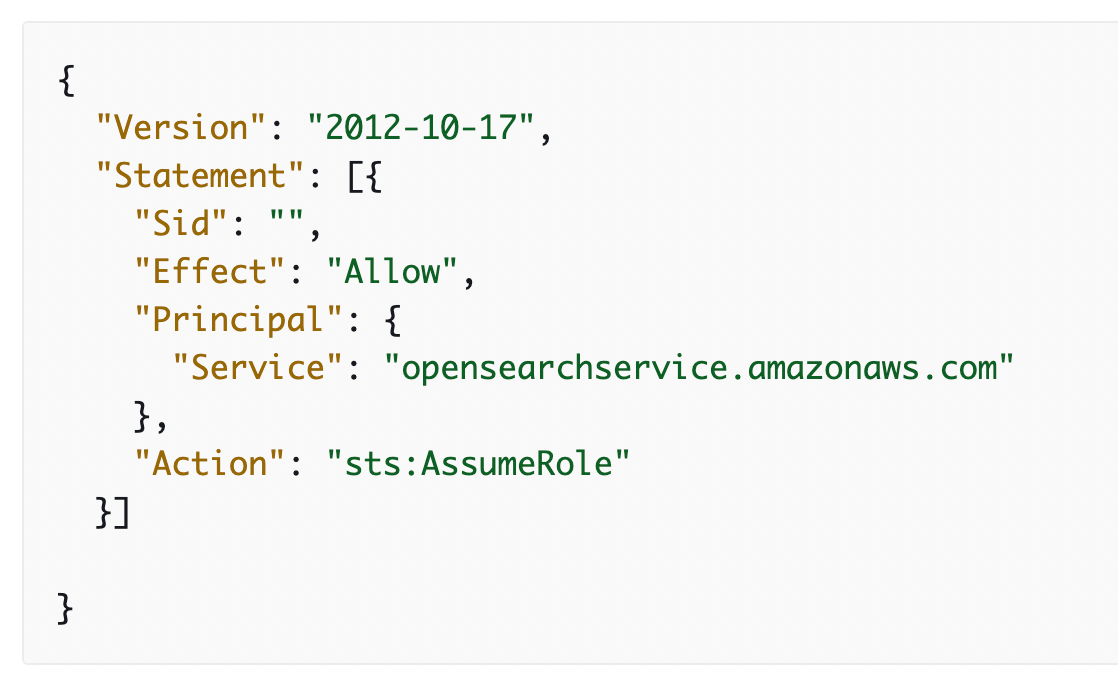
Edit the trust relationship
Edit the trust relationship of TheSnapshotRole to specify OpenSearch Service in the Principal statement as shown in the following example:
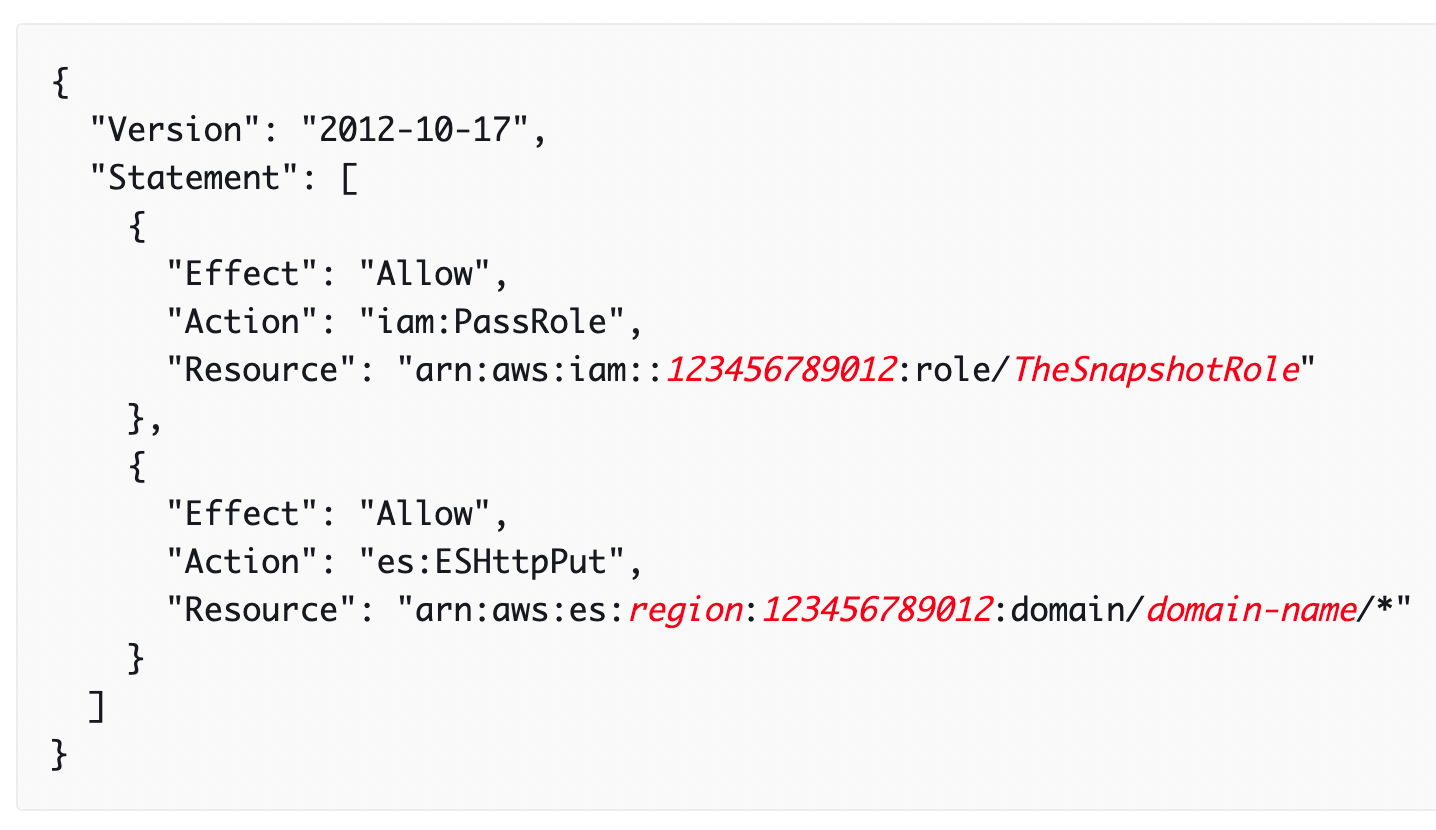
3. Create an IAM User - In order to register the snapshot repository, you need to be able to pass TheSnapshotRole role to OpenSearch Service. You also need access to the es:ESHttpPut action. To grant both of these permissions, attach the following policy to the IAM user or role whose credentials are being used to sign the request. Replace your AWS account ID and add the name of ES Cluster in place of domain-name.
4. Create an EC2 running Linux that can connect to the ES Cluster - Simply host it in the same VPC/subnet as ES.
Registering a Manual Snapshot Repository
You must register a snapshot repository with Amazon ElasticSearch Service before you can take manual index snapshots. If your ES domain resides within a VPC, your computer must be connected to the VPC in order for the request to successfully register the snapshot repository
- On your EC2 instance, install python, aws4auth and boto3 by using the following commands.
- yum -y install python-pip
- pip install requests-aws4auth
- pip install boto3 (in case if it is not installed)
2. Modify the following Python code accordingly. Make sure to add/modify host (https://domain-name.com/), region, access_key, secret_key. On the payload, add the s3-bucket-arn, region and role_arn that was created earlier.
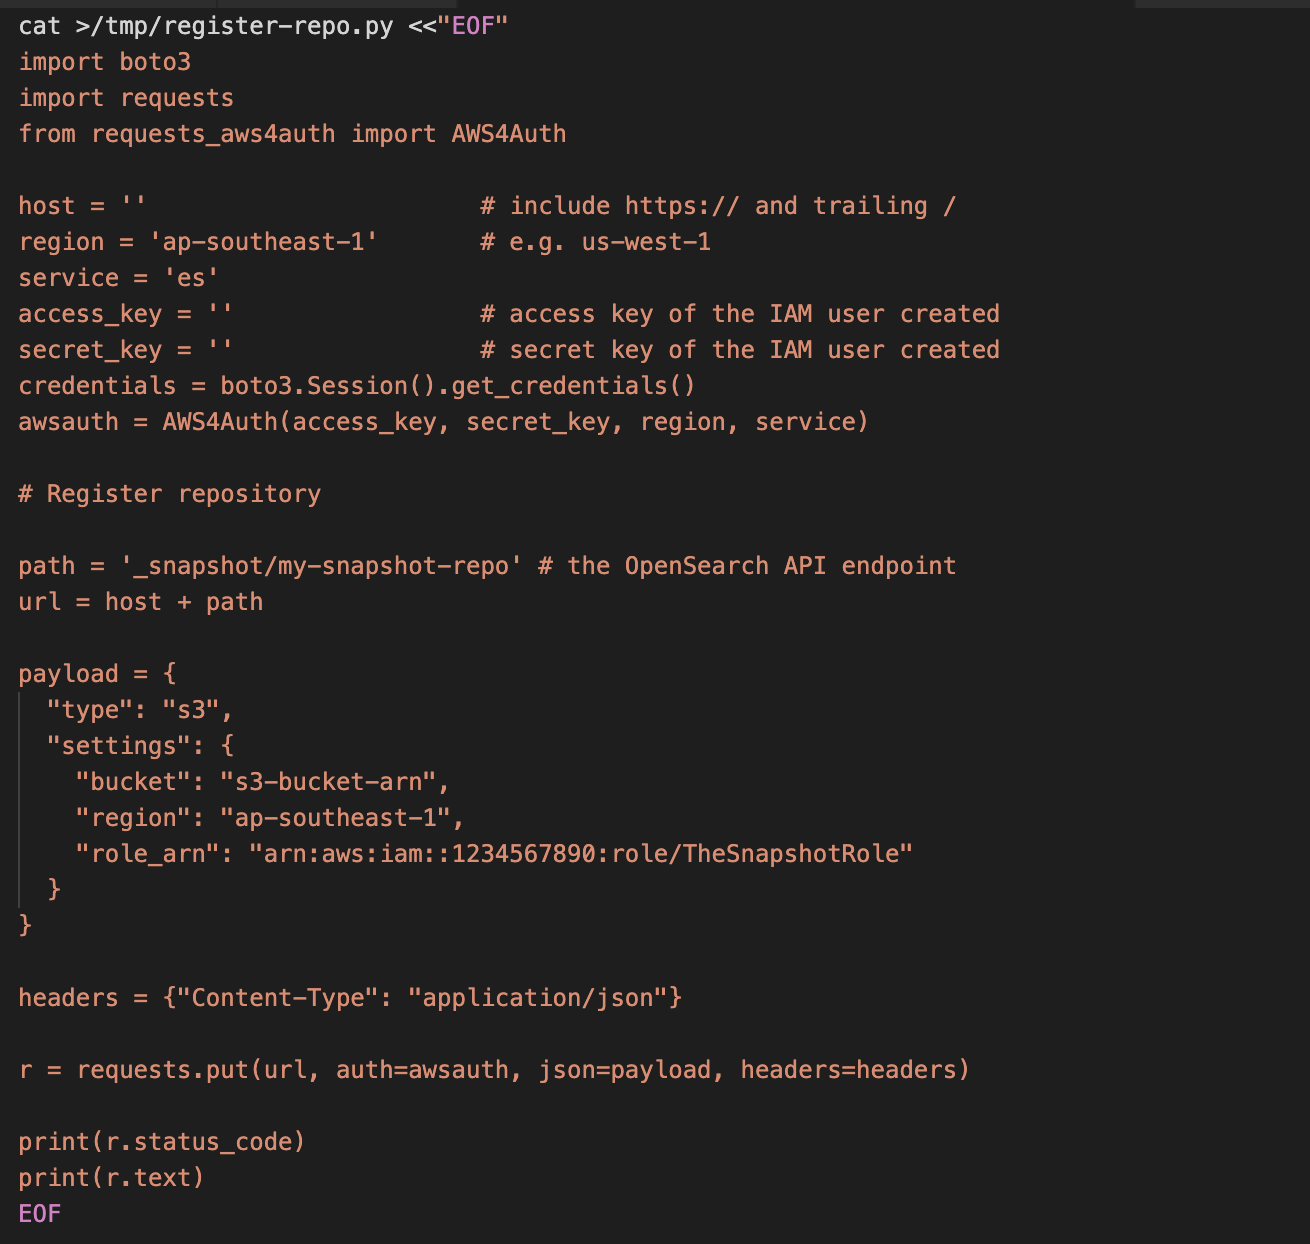
3. After doing the modifications to the above snippet, copy the contents and paste it to the EC2 terminal. Now, run the python script using the below command:
python /tmp/register-repo.py
It should give the output something like this below:

Now, we have registered the repo to take the snapshot. The repo registration can also be done using Postman API platform.
Let's now see how to take the manual snapshot by using the following command:
You specify two pieces of information when you create a snapshot:
- Name of your snapshot repository - Ex:
my-snapshot-repo - Name for the snapshot - Ex:
name-of-the-snapshot
Note: Snapshots are not instantaneous; they take some time to complete.

Use the following command to verify the state of snapshots of your domain:

After successful completion of snapshot, we should get something as below output:

Now, we have successfully captured all the indices of the ES cluster and stored it in the S3 bucket, you can also verify the S3 bucket contents by logging into the AWS Console.
Since we are migrating the ES cluster across accounts, it is important to copy the snapshot contents across accounts as well. Now, we have stored the snapshot in a S3 bucket in Account A, we now have to have the same indices in another account (Account B), it is important to restore all the indices to the new ES cluster in Account B so that our ES would function as normally as it was working before in the old ES cluster.
To make this happen, create another S3 bucket, bucket policy, IAM role and IAM user in Account B (as we did for Account A) and sync all the contents across buckets.
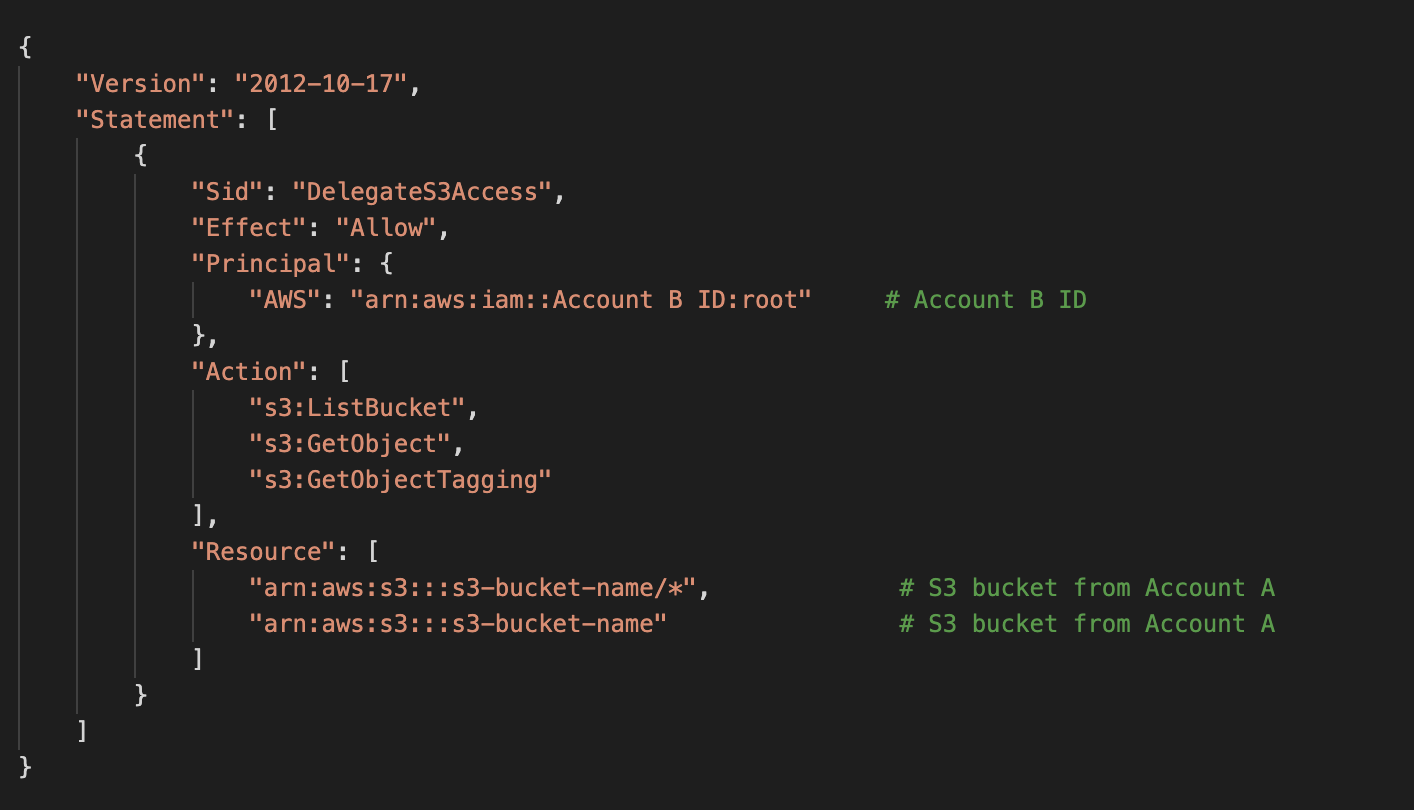
After the S3 bucket (Account B) is created, attach the below bucket policy to the bucket.
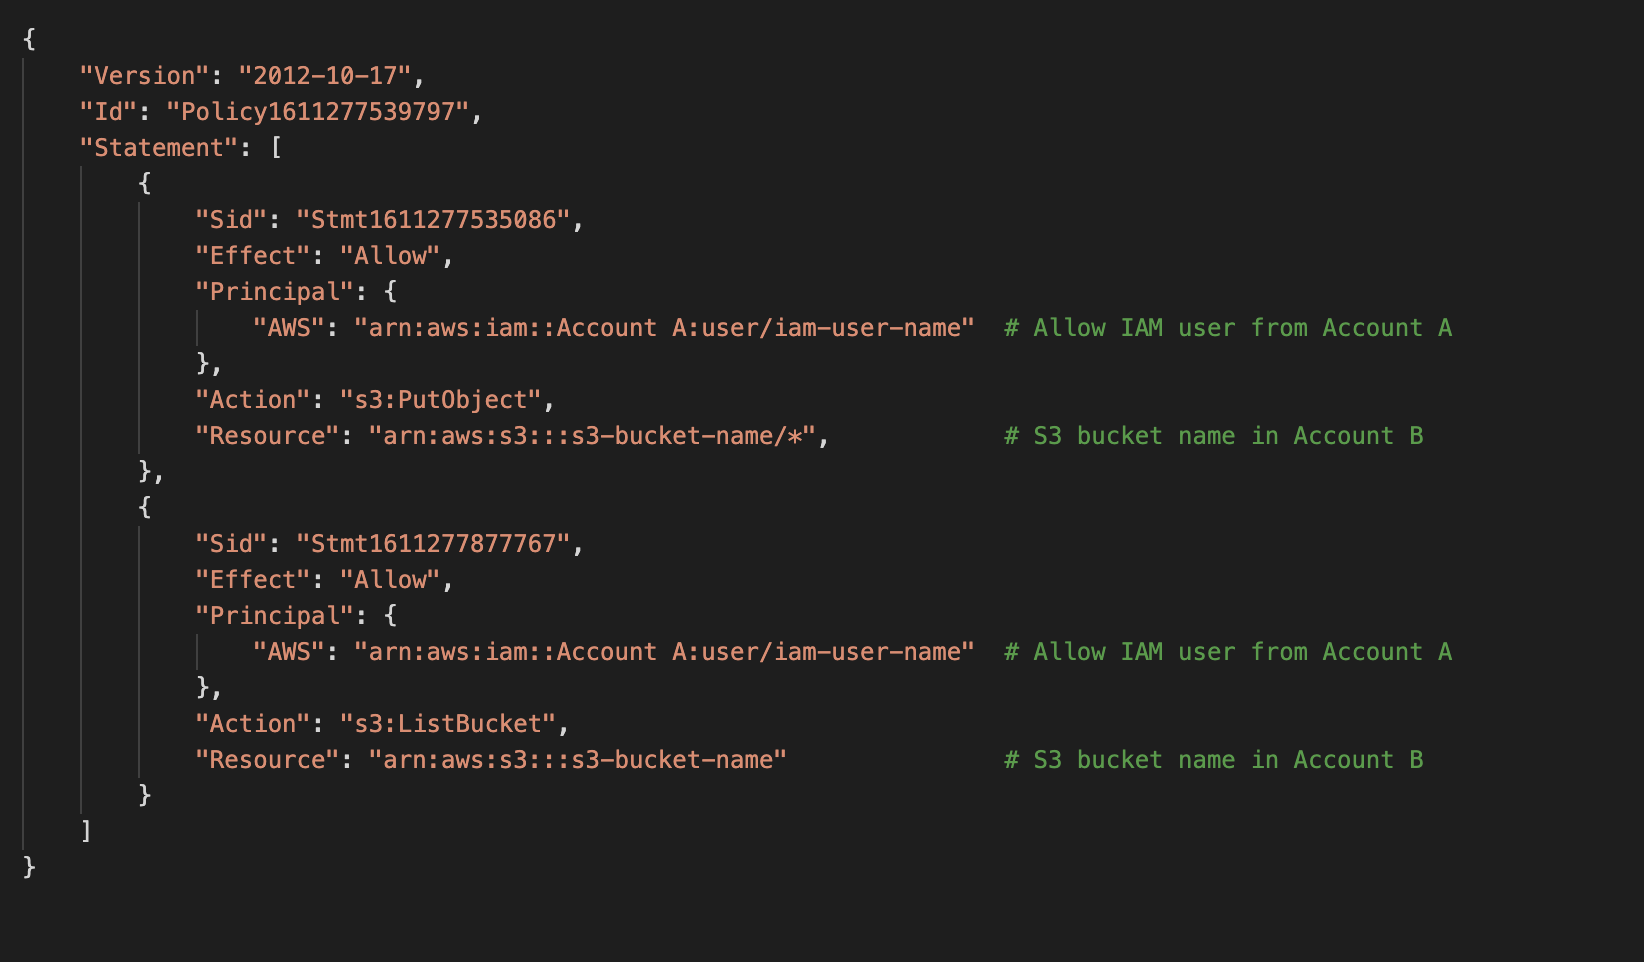
Attach the below bucket policy to S3 bucket created in Account A, so we have enough permissions to sync the bucket contents between accounts.
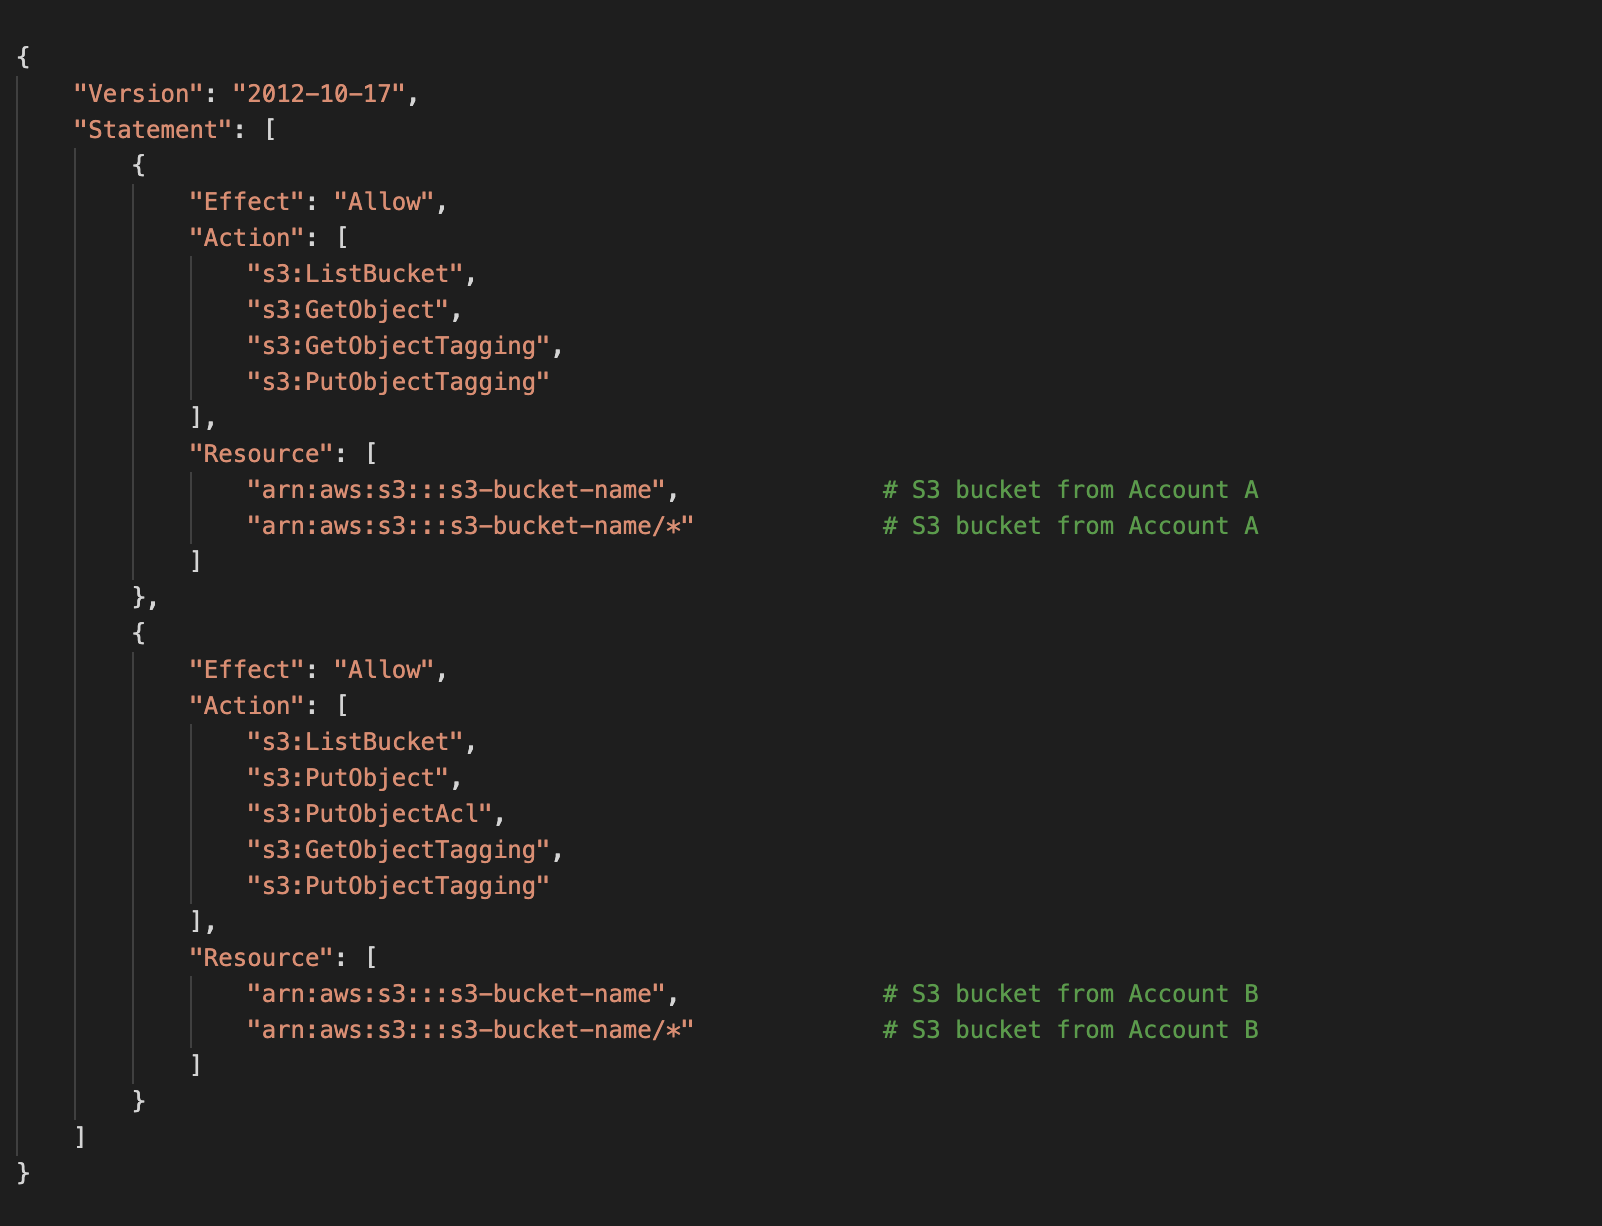
Create a IAM user and attach the below policy to the IAM user in Account B.
Now, we can use aws sync command to copy all the S3 contents between buckets. Before that, make sure you add the access key and secret key of the IAM user in Account B to your ~/.aws/credentials file to perform AWS CLI operations.

The above command should do the trick to sync all the bucket contents. Verify the bucket size and number of objects in Account B, it should match with S3 bucket in Account A.
Now, we have to register the S3 bucket as a repo in Account B so that we can achieve indices restoration (make sure to have a new ES Cluster in Account B) in the new ES cluster.
For this to happen, create another EC2 instance in Account B (preferably in the same VPC as the ES Cluster)
We can make use of the same Python script mentioned above. Change the host (new ES cluster endpoint), access_key, secret_key and payload information. Run the same command to execute the file and get a status of 200 acknowledged message.
Start with restoration
Since we have everything set up, it's now time to restore the indices. Run the following command and it should return true.

To verify the restoration status, run the following command:
After successful restoration, you should have the same number of documents in both old and new ES clusters. Then, we can change the endpoint URL in Route 53 by pointing to the new ES cluster and thus the new ES cluster would be actively receiving requests since new ES cluster would get all the traffic.
Conclusion
By following the above process, we can migrate indices from one ES cluster to another by taking snapshot and restoring it.
View Comments