Setting up AWS SSO and AWS Client VPN
Scroll DownAWS Client VPN is a simple solution that allows users to connect from anywhere to their AWS environments. Single sign-on (SSO) is used widely across organizations to authenticate and authorize their users’ access to enterprise applications and IT services from a single identity provider (IdP). In this article, I’ll share you the process of configuring AWS Client VPN with AWS SSO to both authenticate users and authorize them to use one or more segments of the network using authorization to specific network subnets.
Deploy and Configure AWS SSO
Under the admin account go to AWS SSO service and create two groups:
vpn-stagevpn-prod
create a two SSO application called VPN:
- Add a custom SAML 2.0 application
- Download
AWS SSO SAML metadata file, we will use it a bit later - Set session duration:
12 hours - Application ACS URL:
http://127.0.0.1:35001 - Application SAML audience:
urn:amazon:webservices:clientvpn
Add another application called VPN Self-Service with the same settings, except:
- Application ACS URL:
https://self-service.clientvpn.amazonaws.com/api/auth/sso/saml
Add attribute mapping for these apps:
Subject—user:subject—emailAddressmemberOf—${user:groups}—unspecified
Assign the groups to these apps.
Create an IAM Identity provider
The IAM identity provider bridges the gap between your identity provider, which in this case is AWS SSO, and IAM which helps you assign the appropriate IAM permissions to users.
- Navigate to the IAM page in the AWS console, and click in the left navigation column for “Identity providers”.
- Click the blue “Add provider”.
- Select “SAML” for the Provider type, and give the provider a name.
- Upload the metadata file you downloaded previously when creating the SSO Application
Configure AWS Client VPN
You will need the ARN of the certificate that should already be provisioned in ACM. You will also need to select a CIDR range that is between /12 and /22 that can be used to assign IP addresses to VPN clients.
- Click the blue “Create Client VPN Endpoint”
- Optional – Name Tag:
AWS Client VPN - Optional – Description:
Something useful that describes your VPN Client Endpoint - Client IPv4 CIDR: xx.xx.xx.xx/22
- Server certificate ARN : Select
your ACM Certificate from the dropdown - Authentication Options: Select
Use User-based authentication - Select
Federated authentication - SAML provider ARN: use the IAM ARN created earlier
- Do you want to log the details on client connections?:
No - Do you want to enable Client Connect Handler?:
No - DNS Server 1 IP address:
1.1.1.1 - DNS Server 1 IP address:
1.0.0.1 - Transport Protocol:
UDP - Enable split-tunnel:
Check - Enable self-service portal:
Check - VPC ID: use your VPC identifier
- Security Group IDs: Select the security groups you want to associate with your VPN endpoint
- VPN Port:
443
Associating the VPN Endpoint with your VPC
- On the VPC Console, click the “Client VPN Endpoints” link, and select your Client VPN Endpoint
- Select the Client VPN Endpoint for which you want to create the association
- Select the “Associations” tab in the lower window
- Click the “Associate” button
- Select the VPC for which you are creating the association
- Select the subnet you want to associate.
- Click the “Associate” button. (This may take 2-5 minutes to show Available/Associated)
creating authorizations
- Navigate to the Client VPN console page, and select the “Authorization” tab.
- Click the “Authorize Ingress” button
- Destination network to enable: xx.xx.xx.xx
/24(CIDR notation for the subnet you are creating an authorization rule) - Grant access to: select
Allow access to users in a specific access group - Access group ID*:
guid for the group ID obtained from the AWS SSO Console - Description:
DBA Access to database subnets - Click the “Add authorization rule”
for peering
- Add a route to direct traffic to the peered VPC. for Route destination, enter IPv4 CIDR range of the peered VPC, and for Target VPC Subnet ID, select the subnet you associated with the Client VPN endpoint.
- Add an authorization rule to give clients access to peered VPC. for Destination network, enter IPv4 CIDR range of the peered VPC.
VPN Client Setup
- Follow the VPN self-service link, it looks like https://self-service.clientvpn.amazonaws.com/endpoints/cvpn-endpoint-0a6dbaff819457b64
- Download VPN Client for your OS, and client configuration( sometimes will throw some error, try with different brower or wait for sometime)
- Run VPN client,
- Next, you will need to add a new connection profile to the client
- Click File > Manage Profiles
- Click the “Add Profile” button
- Provide a name for your VPN Connection and select the configuration file you downloaded.
- Click “Add Profile”
- connected to VPN
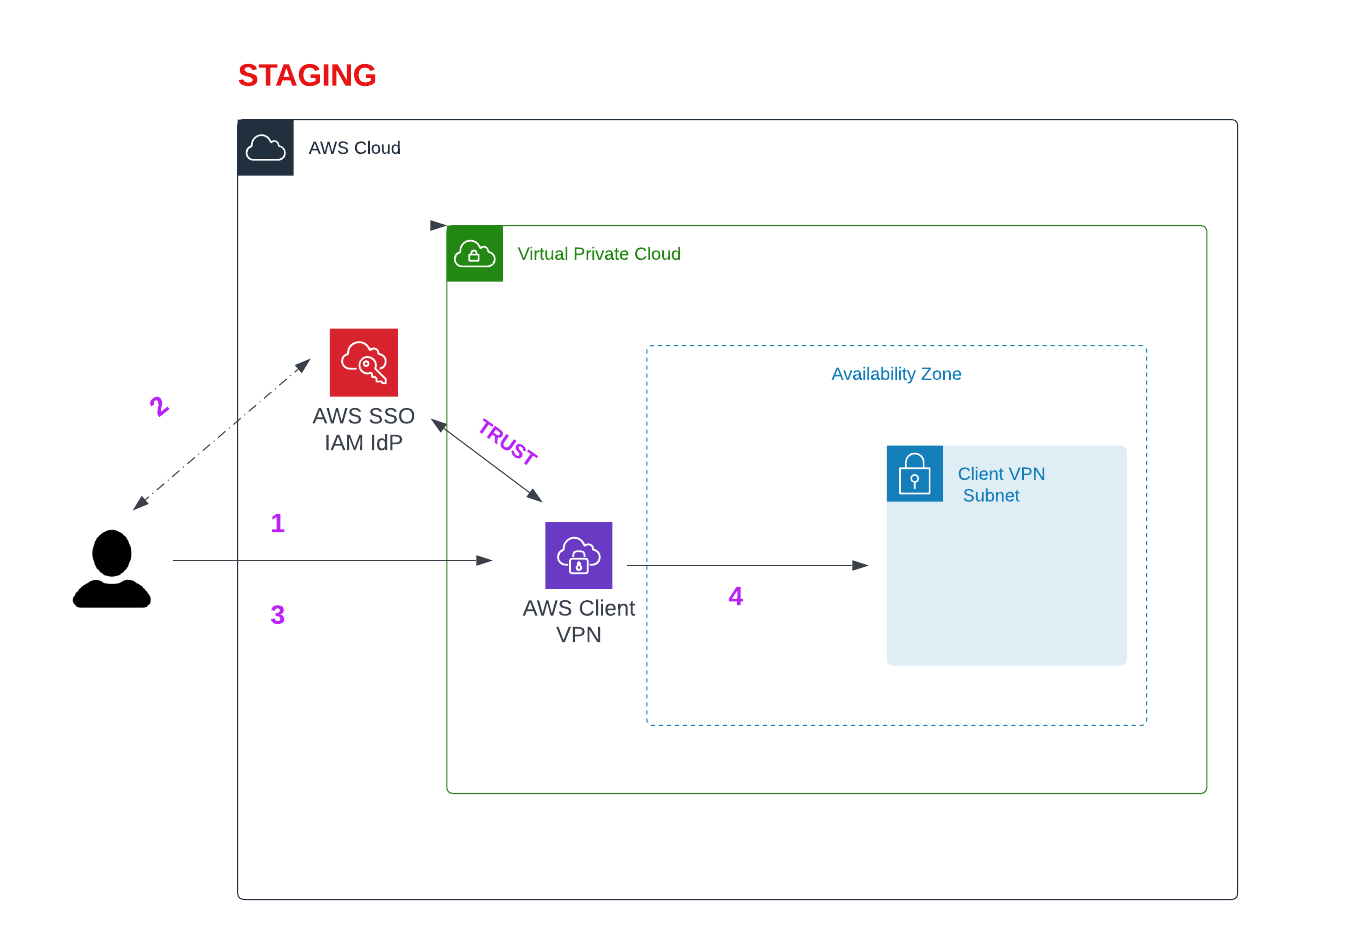
HOW CLIENT VPN WORKS:

- Once the user connects to the VPN will redirected to a
http://127.0.0.1:35001URL - you will see a message “Authentication details received, processing details. You may close this window at any time.”.
- The user connected to the VPN.
- We have a dedicated subnet attach to a client vpn, all traffic to aws flows through that.
- To access the resource in different vpc, we create a peering and add route to client vpn endpoint
Now we able to establish a secure connect between your local machine and aws resources.

View Comments